Managing visitors is an essential part of any event. With Visit, you can easily create, edit, and delete visitor records, as well as assign them to different categories, groups, and sessions. You can also view and export visitor data, such as registration details, attendance history, and feedback ratings. Visit also allows you to communicate with your visitors via email, SMS, or push notifications, and send them personalised invitations, reminders, and thank-you messages. In this help page, you will learn how to use the Service Center module to manage your visitors effectively and efficiently.
The Visitors tab lists all participants who registered for your event. You can filter and sort the list by various criteria, and also perform different actions to one or multiple selected visitors.
Access from Homepage: Select your event > Service Centre > Visitors
Visitor actions
On the Visitors tab you can perform various actions. You can apply the actions to all visitors, or select specific ones and apply the actions to the selected records only.
- Select Actions.
- Select one of the following actions:
| Action | Description |
|---|---|
| Add visitor | Manually add a visitor. Visit Create allows you to choose the registration form to use. |
| Import visitors | Bulk import visitors from an Excel spreadsheet. Refer to Import visitors for more information. |
| Send e-mail | Email all or selected visitors. |
| Invite | Invite selected visitors to an event. |
| Add tag | Add a custom tag to a visitor. This allows you to sort your visitor list into categories or groups. You can search for all visitors with a given tag. |
| Document bulk delete | You have the option to delete visitors’ sensitive data, such as ID or passport photos. Select all or just specific visitors for whom you wish to delete the documents and then choose the document type from the drop-down list: profile photo, ID card, other or identity photo. |
| Bulk update | Allows you to update Partner, Registration type, Form and Translation fields for multiple visitors at a time (all or selected ones). |
| Export | Export visitor data. Visit Create asks you to choose a mapping. The mapping determines which database columns Visit Create includes in the export. You can choose the default mapping, Visitor Export for Visit Create, or choose an existing custom mapping. To customise what data Visit exports, create a new mapping: 1. On the Select mapping step, select Create mapping. 2. Enter a name and description for the mapping. 3. Select Save. 4. Configure your custom mapping by dragging elements from the Available columns list to the Selected columns list. 5. Select Save to save the custom mapping, or Save & Export to save the current mapping and start the export. |
| Generate documents | Generate a document, such as a badge, for visitors. Select the type of document you wish to generate, sort list by company, name country or registration type, select the sort direction and group (all, visitors or tickets). |
| Find duplicates | Use this to run de-duplication if you have previously allowed duplicate records (for example, when bulk importing visitors). Refer to Find and manage duplicate visitor records for more information. |
| Print remote | Prints document(s) for selected visitor(s) using a selected Check-in. The selected Check-in will display a confirmation dialog when print job is waiting, starting print or is being cancelled. |
| Delete | Delete visitors. |
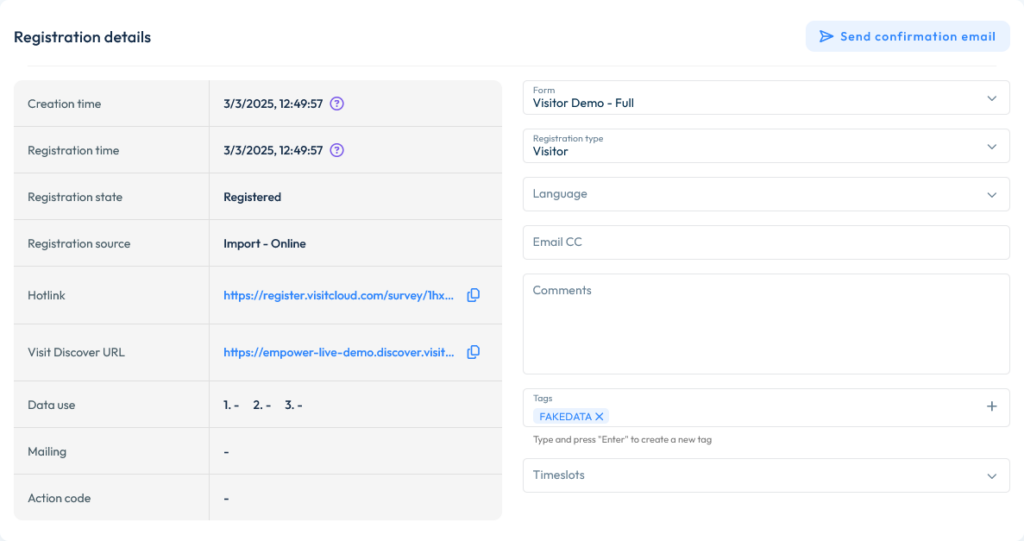
View and edit visitor data
Access from Homepage: Select your event > Service centre > Visitors
You can access detailed information about each visitor.
| Tab | Options |
|---|---|
| Registration details | You can: View Registration data, such as: time, state, source, registration and Visit Discover URLs, data use, mailing, action codes and if the visitor was invited by a partner. Send their confirmation email (must be set up in Forms). View privacy consent. Choose to stop processing visitor in reports, and to make profile public. View and edit registration form, registration type and language. Define an Email CC, which allows confirmation emails to be automatically sent to a secondary email address upon form submission. This is also available in Forms and includes standard email validation. The CC email address is associated with the visitor, at Event Level, so for situations where one contact is connected to multiple events this enables each registration to use different CC contacts. Enter comments, add tags and timeslots, edit answers to profile questions. These are questions the visitor answers on the registration form, and from the Visitor questions list. Refer to Add and edit questions for information on creating questions for registration forms. Refer to Add visitor questions for information on using the Visitor questions list. |
| Approve & Decline | If you have Enabled registrant verification for this visitor registration form, this is where you can approve or deny access. |
| Actions | This is where you can view the visitors’ actions at the event, such as entries, exits, scans, and dwelling time. |
| Activities | View activities such as workshops and seminars that the visitor has signed up for. |
| Documents | View and download ID or profile photos, if available. |
| Orders | View any orders placed by the visitor. |
| Email overview | View details about any Visit Create emails sent to the visitor. |
| Biography | Enter any information about the visitor that you may want to share with the public (speakers’ biographies for example). |
- Hover over the visitor you want to view or edit.
- Select Edit . Visit Create displays the Edit contact details page. You can edit visitor information such as contact details.
- To view details relating to an event, select the event in the Registered events menu.
- Select a tab to view and edit details and perform other actions:
- Select Save to save changes.
- Select Back to return to the Visitors list.
Import visitors
Access from Homepage: Select your event > Service centre > Visitors > Actions > Import visitors
You can bulk import visitors using an Excel workbook.
Before importing
There are some factors to consider when structuring your data for import:
- You must include a reference ID for each visitor. Visit Create rejects the import if there is no reference field in the workbook mapped to the reference field.
- Are you going to use multiple translations in your event? If yes, then you need to include a Languages column.
- Consider using a tag field. This allows you to filter on the tag field in the Service Centre to identify the imported registrants. Tags are a flexible way of grouping and categorising registrants.
- Break down the data into as small as possible chunks. For example, instead of putting the visitor’s full name in a single column, use separate columns for title, first name, and last name.
- Ensure that the data is clean. For example, if you are using initials, are they all in capitals and separated by full stops? Are all telephone numbers complete and in the same format?
- When including shop item purchases in the import, note the following:
- You must include a column for each shop item. Each cell in the column must contain a number, indicating how many items each visitor gets.
- Visit Create does not process payments for imported shop items. The import creates zero-value items. You can map to free or paid items, but the value is always zero in Visit Create.
- You can only map shop items for registered visitors, not for invited visitors.
Import a file
- Select the Visitors tab.
- Select Actions.
- Select Import Visitors. The import workflow opens.
- Select Upload file to choose the spreadsheet to upload.
- Select Next step → to proceed to the mappings page.
Select mapping
- You can select an existing mapping, or create a new one as follows:
- Select Create mapping.
- Enter a name and description for the mapping.
- Select Save.
- Select Next step to proceed to the Preview mappings page.
Preview mappings
Map each column of the spreadsheet to a field in the Visit Create database by selecting the database field from the Map column dropdown.
For example, map the Title column in the spreadsheet to the Title column in the database:
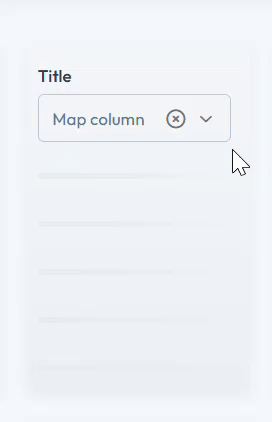
Set up all the mappings, then select Next step to proceed to the test run page.
Test run
Visit Create tests the mappings and warns you about any errors. You can select Previous step to go back and resolve any issues.
Once there are no issues, select Next step to run the import.
Complete import
The complete import page displays a success message once Visit Create imports all records. Select Finish to return the Visitors list.
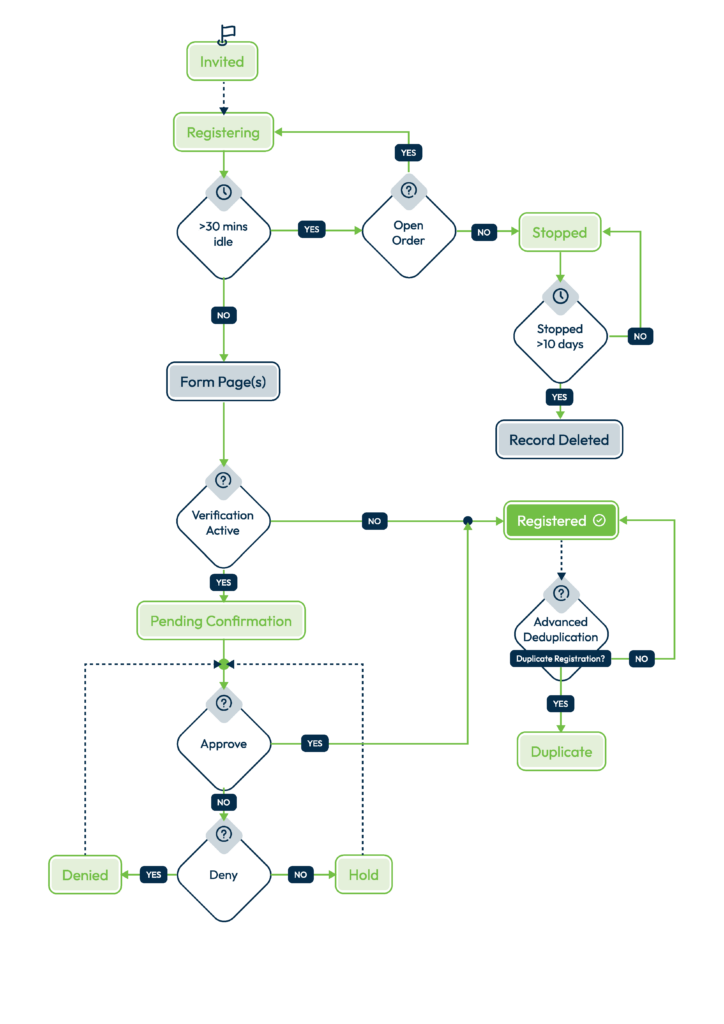
Visitor registration states
There are several registration states, some being available by default, and some only when specific settings are enabled.
Below is a list of all the registration states in Visit and their meaning:
| Registration State | Meaning |
|---|---|
| Invited | Invited is used in pre-population scenarios where the visitor record is created by a 3rd party. The registrant will use a Visit form to amend / add to their details in order to complete the registration. Invitations may be generated by organisers using the import function, or by exhibitors adding their team members in an ‘invited’ state. |
| Registering | The visitor is in the process of registering. The registration state changes from ‘registering’ to ‘stopped’ after 30 minutes of inactivity. |
| Pending Confirmation | This state is displayed by default when registrant verification is enabled for a specific registration form, the registrant has completed the registration process, but they have not been verified yet (by the organiser). |
| Hold | When enabling registrant verification, records can be put on hold (from the Approve & Decline section) when further investigation is needed (e.g. payment, documents etc.). This is an intermediary state where the registration is under further review. |
| Denied | This requires to have registrant verification enabled for the selected form. This status is displayed when the registration has been rejected by the event organiser. |
| Registered | The registration process is complete. |
| Stopped | The visitor started the registration process, but has not completed it and has been inactive for at least 30 minutes. Stopped records are removed after 10 days. |
| Duplicate | This is a duplicate record. It is only visible when the advanced deduplication module is enabled, and you have set up rules for advanced deduplication in your event setup. For more information, refer to Create rules for advanced deduplication. |
Below is a visual representation of registration states flow:
Find and manage duplicate visitor records
Access from Homepage: Select your event > Service Centre > Visitors > Actions > Find duplicates
Your organisation must have the advanced deduplication module in its contract, and you must set up rules for advanced deduplication in your event setup. For more information, refer to Create rules for advanced deduplication.
- Select Actions.
- Select Find duplicates. Visit Create analyses your visitor records and lists groups of duplicates.
- Visit Create displays the primary record icon (star) on the primary record, according to the hierarchy in your event setup. Refer to Create rules for advanced deduplication for information on creating the hierarchy. You can select the radio button on another record to mark that as primary instead. Each record group must have one primary record.
- Ignore any records that are not duplicates. For example, if Visit Create displays a group of three records and suggests they are duplicates, but you know one of them is a unique record. To stop the unique record from appearing in the list of duplicates:
- Select the record using the checkbox.
- Select Ignore selected. Visit Create does not display ignored records if you run Find duplicates again, unless there is a new record that matches it. You can view a list of ignored records. From the Visitors list:
- Select Actions.
- Select Find duplicates.
- In the Display dropdown, select Show ignored records.
- Link duplicate records:
- Select the records using the checkbox.
- Select Link selected. You can perform this for multiple groups at once. Visit Create links each record to the other records in their group. Visit Create uses the primary record as the main record for future actions, such as sending emails. For example, you have three records in a group. You know they are duplicates, so you select the group and link them. Next time you send out an email to that visitor, Visit Create sends the email to the email address for the primary record only.
Refund an order
Access from Homepage: Select your event > Service centre > Visitors
If you edit a completed order, it may have a negative balance (the visitor may be owed a refund).
- Hover over the visitor you want to refund.
- Select Edit. Visit Create displays the Edit contact details page.
- Select the event in the Registered events menu.
- Select the Orders tab.
- If a refund is available, Visit Create displays the Refund button. Select Refund.
- Enter a reason for the refund.
- Select Refund. Visit Create displays a message telling you whether your PSP accepted the refund.