This section is tailored to give you the know-how to efficiently handle all aspects related to partners—whether they are sponsors, exhibitors, or collaborators. Follow these step-by-step guidelines to add new partners, edit existing partner profiles, and manage their participation in your event. Mastering these functionalities enables better coordination and enhances the overall success of your events.
Access from Homepage: Select your event > Service centre > Partners
Partner actions
On the Partners tab you can perform various actions. You can apply the actions to all partners, or select partners from the list and apply the actions to the selected records.
- Select Actions.
- Select one of the following actions:
| Action | Description |
|---|---|
| Add partner | Manually add a partner. Visit Create allows you to choose the registration form to use. |
| Add tag | Add a custom tag to a partner. This allows you to sort your partner list into categories or groups. You can search for all partners with a given tag. |
| Import partners | Bulk import partners from an Excel spreadsheet: Upload your file. Choose the type of mapping you wish to proceed with. Fix any found errors. Select Finish. |
| Send e-mail | Send an email to selected partners. |
| Export | Export partner data as an Excel spreadsheet. |
| Delete | Delete partners. |
Edit a partner
- Hover over the partner you want to edit.
- Select Edit. Visit Create displays the Edit company details page. You can edit company information such as address, and partner information such as name.
- To view details relating to an event, select the event in the Registered events menu.
- Select a tab to view and edit details and perform other actions.
- Select Save to save changes.
- Select Back to return to the Partners list.
| Tab | Options |
|---|---|
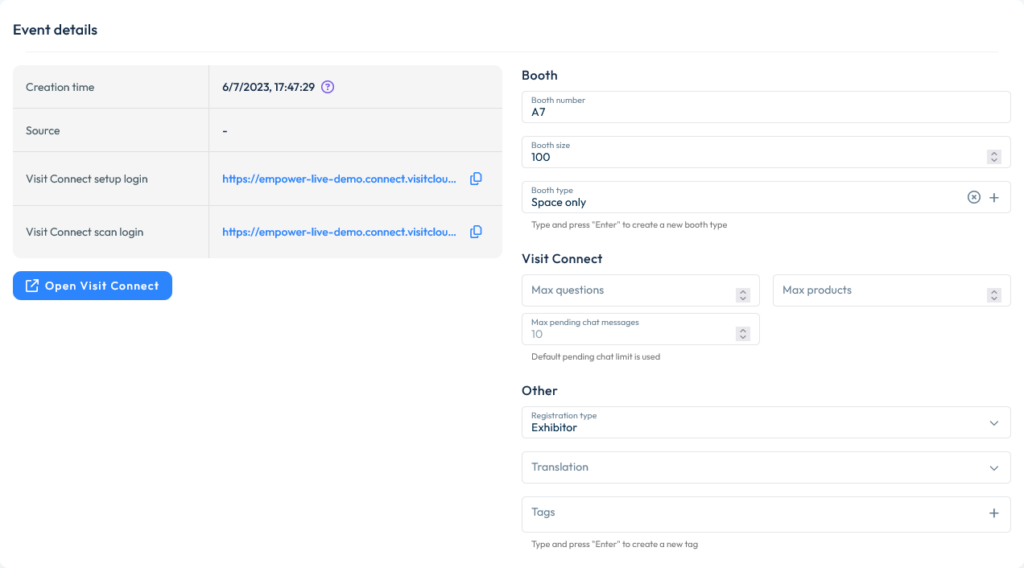
| Event details | Edit the Booth number, Booth size, Booth type, Registration type, Translation, add Tags and Labels. Select Open Visit Connect to open this partner’s Visit Connect account, Visit Connect partner login to create a new login to Visit Connect. Select Visit Connect scan login to open a Visit Connect version with scan permissions. Refer to Visit Connect User Guide for more information. Limit the number of questions/products/pending chat messages a partner can add to their Visit Connect account. If the field(s) remain blank, they will be allowed to add the default number defined in Visit Connect settings for products/questions/pending messages. |
| Staff | Lists staff associated with this partner. You also have the option to Import staff from an Excel file, or select Add to add individual members of the team through the dedicated registration form. |
| Codes | View existing action codes, or select Add to add a new one. Action codes track which partner a registrant came through. |
| Orders | View details about the partner’s orders. |
| Guests | Registrants invited by this partner. |
| Licenses | View and manage Touchpoint, (Connect) API and Scan licenses. |
| Email overview | View details about any Visit Create emails sent to the partner. |
| Digital content | View details about the partner’s digital content. |
| Sponsor | Display the partner as a sponsor in the Visit Discover dashboard and/or splashscreen, and choose whether a click on their name will direct visitors either to the partner’s Visit profile or an external website. |
| Tasks | To view this tab, you must have the Tasks permission enabled, which is only available to Full Access users. Please contact your account manager for further details. This is where you can monitor the status of tasks assigned to this specific partner type. There are three possible statuses: To do, In progress, and Completed. |
Import partners
Access from Homepage: Select your event > Service Centre > Partners > Action > Import Partners

You must define two mandatory fields:
- Define a unique reference in a field within the exhibitor data spreadsheet. This number can be your account number/reference, but it needs to be a unique number, as overlapping references will update the previous record already on the database. The only time you would want to duplicate this is if you are updating an aspect of an existing partner’s details.
- Add a field with the Partner Registration Type in it. This is usually reg type = “EXHIBITOR” for all records.
You have 2 options for the import:
- You can use one of the bespoke system templates (Default mapping from export/template)
- You can create your own mapping
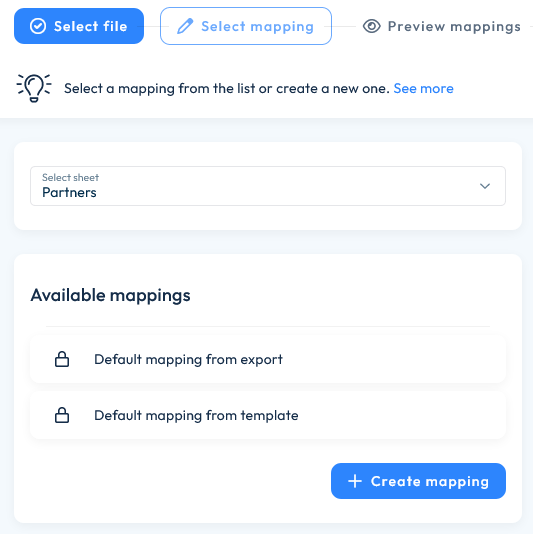
The default mapping
If you wish to import stand badge allocations and track-able source codes, then use the default mapping, as these fields are already set up in the template. You just need to populate the template with your own data.
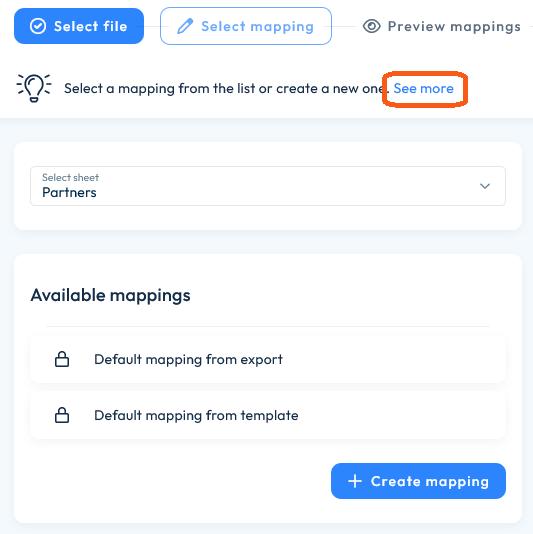
For an explanation of any of the field names in the default template, you can click ‘See more’ to see all the details:
Field headers available for import:
| Column in sheet ‘Partner Import Template’ | Explanation | Validation | Sample |
| Reference | The unique identifier for the contact record | Mandatory | 123 |
| Company | Company name of the partner | None | Visit |
| Address 1 | Address line 1 of partner’s address | None | Donkere Spaarne 24zw |
| Address 2 | Address line 2 of partner’s address | None | |
| Address 3 | Address line 3 of partner’s address | None | |
| House number | House number. This should only be captured separately if you have selected this option in Visit Create. | None | |
| House number suffix | House number. This should only be captured separately if you have selected this option in Visit. | None | |
| Postal Code | Postal code of partner’s address | None | 2011 JG |
| City | City of partner’s address | None | HAARLEM |
| State | State of Partner’s address | None | |
| Country | Country of partner’s address. | 2-letter ISO abbreviation | NL |
| Phone | Phone number of partner | None | 31235120160 |
| Fax | Fax number of partner | None | 31235120161 |
| Website | Website of partner | None | www.visitcloud.com |
| Booth number | Booth number of partner’s booth | None | A412 |
| Booth size | Size of partner’s booth (number of square metres) | Only numbers | 24 |
| CP Gender | Gender of partner’s contact person, (M or F) | None | M |
| CP Firstname | First name of partner’s contact person | None | Sam |
| CP Lastname | Last name of partner’s contact person | None | Ple |
| CP Fax | Fax number of partner’s contact person | None | 31235120161 |
| CP EMail | Email address of partner’s contact person | Mandatory. Must be in format user@domain | sample@visitcloud.com |
| Language | This should be the name of the Translation that is configured in Visit Create. If not, the default translation is used. | None | English |
| Registration Type | Should be a Registration Type which is configured in Visit Create. If not, the default Registration Type for Partners is used. | None | Exhibitor |
| AC Type Name | Action Code Type name. | This field is mandatory if action codes are required. ‘Invitation’ is the default value in Visit Create. Other values can only be entered if they are configured for your organisation. | Invitation |
| AC Name | Action Code Name | Even if action codes are required this is not mandatory. If not filled in, the Partners company name will be used | Partner Discount |
| AC Prefix | Action code prefix. This is only needed when ‘AC Generation Type’ is ‘manual) | If action codes are required, this is mandatory. It may contain letters only with maximum of 4 characters. | NTWO |
| AC Usage Type | Action code usage type; once or multiple times | If action codes are required, this is mandatory. Allowed values are ‘limited’ or ‘unlimited’ | limited |
| AC Usage Count | If Usage Type is ‘limited’, the number it should be limited to should be entered here | If action codes are required and Usage Type is ‘limited’, this is mandatory | 1500 |
| AC Generation Type | Action code generation type. If ‘manual’, you must define the range start, prefix and number of codes. See below. | If action codes are required, this is mandatory. Allowed values are ‘manual’ or ‘auto’ | Manual |
| AC Start | The first number to be assigned to the action codes (only applicable ‘when AC Generation Type’ is ‘manual’) | If action codes are required, this is mandatory. Must be a number | 3456 |
| AC Step | The step in between the codes within the action code range (only necessary when AC Generation Type is manual) | 1 | |
| AC Count | The number of action codes | If action codes are required, this is mandatory. Must be a number | 100 |
| Staff Type | The name of the staff type you wish to upload the number of complimentary badges for (eg. Stand Staff) IMPORTANT: This is only applicable if you want to limit the number of staff badges your exhibitors/partners are allowed to order via Event -> Visit Connect -> Staff. You must configure staff settings accordingly. | Stand Staff | |
| Complimentary badges | The number of complimentary staff badges they will get | 20 |
Creating your own mapping
To import your data in the existing format of your file, you need to map the fields on the import.
This means that you will need to create a correspondence between the column headers in your initial Excel file and the ones in Visit, to ensure that each piece of data retains its meaning and integrity when imported into our system.
Select Create Mapping > Next Step
You will see your field headers above the Map Column box. Match the fields to the system fields.
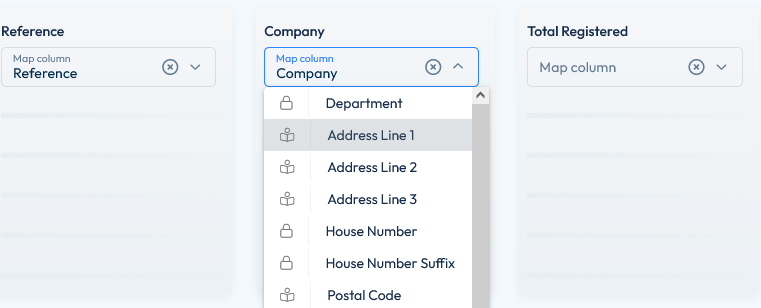
You will need to include the registration type and reference fields. If a field has multiple responses that need to be mapped, you will need to click on the mapping field box and map the answers.
The Registration Type field in the partner import is referred to as Partner Type, and will usually need to be mapped to the correct values.
Once mapped, click on Next Step.
The data is now checked to ensure it is formatted correctly. Continue to import.
If you receive import ‘Warnings’, they will not stop the data upload, they are for information purposes only and you may want to review these (see Field headers available for import table above).
If any errors are found, you will see the error message, and have the option to download the data to correct the errors. The errors are highlighted in the downloaded data.
If required, correct the warnings and errors, then save and repeat the import process.