You can use Visit Create to add and share different types of digital content for your event, such as brochures, white papers, images, website links and so on. You can use this content to provide more information about your event, your partners, or their products. You can also allow your visitors to collect the content by using their smart badge or their phone or tablet.
In this section, you will learn how to add content to Visit Create, how to print content QR codes, and how to link/unlink Touchpoints to content.
Access from Homepage: Select your event > Design > Digital content
Content refers to any digital materials that the event organiser or partners wish to share with visitors at an event. Visitors collect the content by tapping a Touchpoint with their smart badge or scanning a QR code with their phone or tablet.
Partners can also add digital content using Visit Connect.
Content groups
There are two types of content:
- Event content: This is event-related information. Organisers can create and manage event content in Visit Create.
- Partner content: Visit Create generates a digital partner content record every time a partner is added. Partners can add and manage their content using Visit Connect. Partner content can be linked to Visit Touchpoints or Scanpoints that an exhibitor uses at an event. Sharing content using Touchpoints requires a Touchpoint license. Partner content can be company-related or product-related.
Add an event content group
- Click on Upload logo to add a relevant image for your content
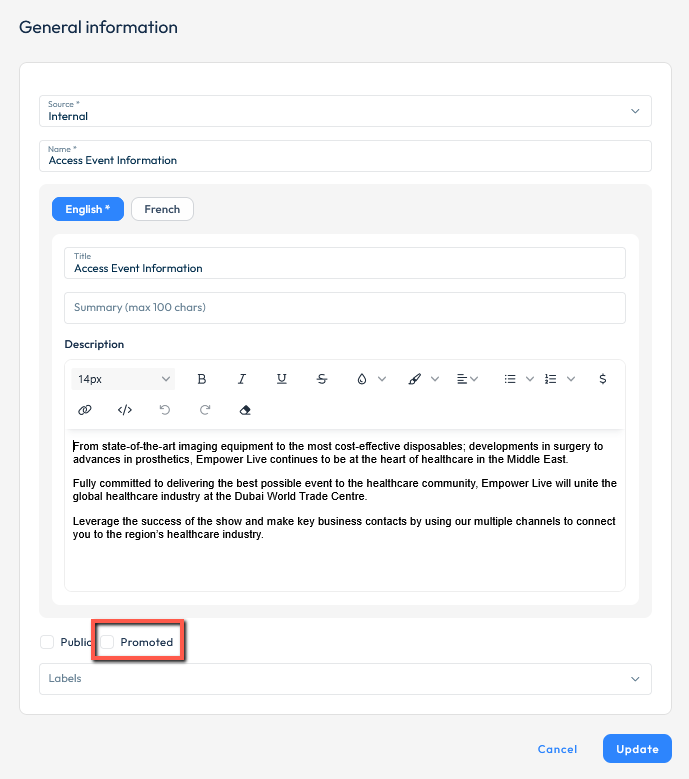
- Click the Edit icon in the top-right corner of the About section. That’s where you can enter general information about this content group:
- Source: choose one from the drop-down list – internal (which means that the content has been uploaded on the Visit server), link, or Jublia – if you’re using Jublia integration and the information has been already uploaded in there.
- Name: enter a name for the content that will be visible to the visitors.
- Summary: You can enter a content summary of up to 100 characters (optional).
- Description: Enter a description of the content. You have the option to edit the appearance of the text, and also add URLs, special characters, dynamic fields and HTML code (optional).
- Public: check this box if you wish to make the content visible in Discover for all visitors, or uncheck it if you want to make it available only to those who collect it by scanning a Scanpoint/tapping a Touchpoint.
- Promoted: checking this box will show the content at the top of the list in Discover (provided that it has been also made public).
- Labels: select on or more labels from the drop-down to have the content recommended to visitors based on their interests. The labels must be predefined – see the Labels section for more details.
- Add attachments by selecting the Add icon.
- Name: enter a name for the attachment that will be visible to visitors.
- Type: choose the type of content you wish to add. You can add URLs, documents – such as PDFs, images, audio, or video files. You can add multiple attachments of various types to the same content group by following the same process.
Edit groups and content
- Hover over the content group you want to edit.
- Select Edit .
- Change the content settings, or select Add attachment to add more content.
- Select Save.
You can also choose specific partners and products to be displayed at the top of the exhibitor and product list in Discover by checking the ‘Promoted’ box.
Bulk import and export partner logos and descriptions
Access from Homepage: Select your event > Design > Digital content > Partner content
You can import partner logos and descriptions from a spreadsheet, to bulk update partner digital content. The logo and description appear in Visit Discover when a visitor interacts with the partner.
- Select Import.
- Select Download to download a template.
- Add partner logos to the template. The template file contains detailed instructions.
- Select Upload file to upload your logo spreadsheet.
- Select Import to add the logos to Visit Create.
You can also export the same partner information:
- Select Export.
- Choose the export file type.
- Select Export. Visit Create prepares the file.
- When the file is ready, select Downloads , then select the file you want to download.
Content Scanpoints
Scanpoints are QR codes that will automatically appear in Visit Create and Visit Connect when the Content Management and Sharing module is activated. Partners can download and print their Scanpoints from Visit Connect, and they can embed them into their branded printed materials such as placards, posters and stands. To check whether the Content Management and Sharing module is active, please contact your account manager.
Print content Scanpoints
You are able to print content Scanpoints with a connected Zebra printer. This is currently only supported in Chrome on macOS and Chrome on Windows 7 or higher.
Link/unlink Touchpoints to/from content
Touchpoints can be linked and unlinked to and from Digital Content in both Visit Create and Check-in.
Access from Homepage: Select your event > Design > Digital content > Event content / Partner content
- Select Design > Digital Content.
- Select the content you wish to assign a Touchpoint to.
- Connect a Touchpoint to your computer using a MicroUSB cable (contact your client manager to make sure your Touchpoint has the correct firmware version) and press connect.
- Place the Touchpoint you wish to link to your content on the plugged Touchpoint, facing each other and link it.
Auto-link Touchpoints
For a faster linking process, click on the Auto-link button. This will automatically select the next digital content on the list and the user can simply place a new Touchpoint on the plugged Touchpoint to get it linked.
Unlink Touchpoints
To unlink a Touchpoint, simply place a linked Touchpoint on the plugged Touchpoint and click on Unlink.
Print label
It’s possible to automatically print a label with a Zebra printer when you check Print label.