Organiser Tasks
This is your complete guide to delivering events using our engagement apps: Visit Discover for attendees, and Visit Connect for exhibiting companies.
This section explores each of the main tasks, in the order they should be completed (some tasks are dependent on each other).
Some prior knowledge of the setup of Visit events and registration forms is assumed.
The terms exhibitor and partner are used interchangeably in this document. In the Create interface they are referred to as Partners, however in Visit Discover, attendees view them named as Exhibitors.
Step 1
Configure event dates / times
Two sets of event dates (Enable online networking)
Select the Enable online networking checkbox if you wish exhibitors and visitors to communicate using the chat and messaging functions outside of the onsite event dates.
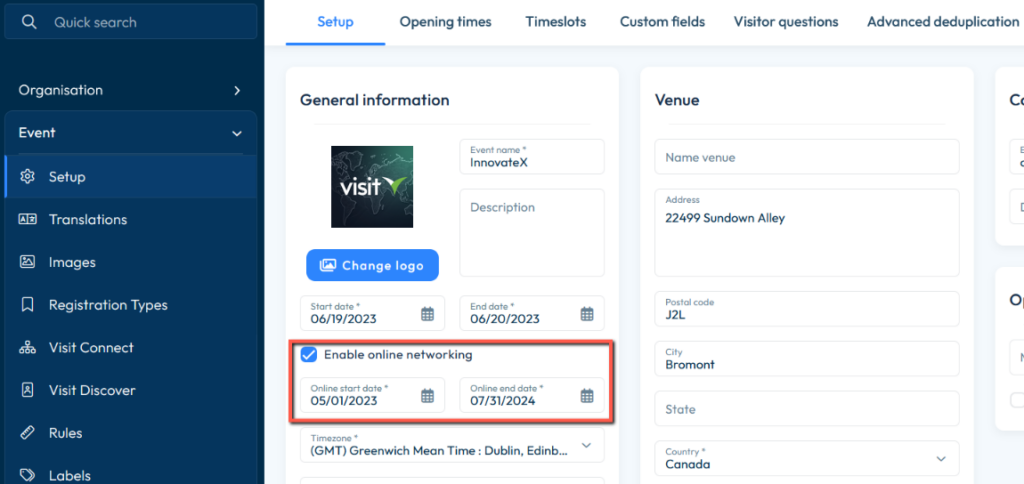
Typically, the Online start date will be before the event start date, and the Online end date after the live event completes.
When using Visit Connect, exhibiting companies will be able to define their meeting availability based on the online dates configured.
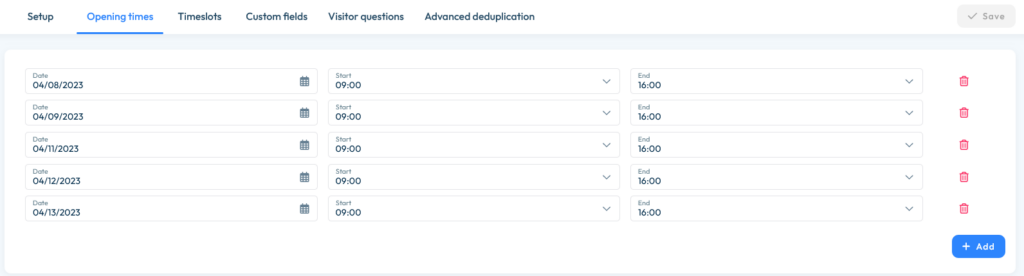
Set Onsite opening times
Define the onsite opening times for each of the onsite event day(s). Times are in the local time-zone of the event, as defined in the event configuration.
Step 2
Configure event color palette
Modify or add to the event color palette, which is used to define a set of consistent colors referenced throughout the Visit ecosystem. In particular, the colors you define here control the appearance of the Visit Discover app. Changing colors here affects all components using them.
Base colours: define the appearance of the user interface background.
Accent colours: assigned to items which appear within the user interface, such as buttons and agenda tracks / rooms.
See Color palette for further details.
Step 3
Define event labels & how to allow exhibitors/partners to assign profile and product labels
Labels are categories of information which power the visitor matchmaking algorithm, based on interactions with the platform.
Labels you define may be attached to:
- Shop items
- Responses to registration questions (answers)
- Agenda items
- Event digital content
- Exhibitor digital content
For each label you define, specify:
- The name of the label, as it appears in the interface. This is the name of the label for your reference as the event organiser.
- Translation of the label in each of the languages used. This is how the label will appear to the registrant, dependent on their language selection.
- A color for the label, as displayed in the Visit Discover interface.
- Under Categories, define whether the label can be defined to exhibitor profiles and/or their products. This controls whether Visit Connect users have visibility of the label when managing their own digital content.
Check out Labels for additional information.
Step 4
Configure Sponsorship Tiers
Sponsorship tiers are used to group together sponsoring companies on the Visit Discover dashboard.
When making use of this feature, at least one tier must be defined. For each tier, define the name as it appears in the Create interface, and a corresponding translation for each of the languages in use.
Find out more about Sponsorship.
Step 5
Configure Onsite locations (Areas – Onsite menu)
When defining activities in the upcoming task, they will be assigned area locations. An area is an onsite space against which attendance can be tracked, typically be a presentation theater or room.
When defining scanning devices, these are attached to a location. An area may have multiple In scanners (known as gates), optionally Out gates may also be configured if duration of attendance (dwell time) is required.
Learn more about managing locations.
Step 6
Configure Visit Connect settings (meetings, content management, connections)
Enable Content Management > Allow your partners to manage their profile and products for the partner registration types you wish to manage their own digital content.
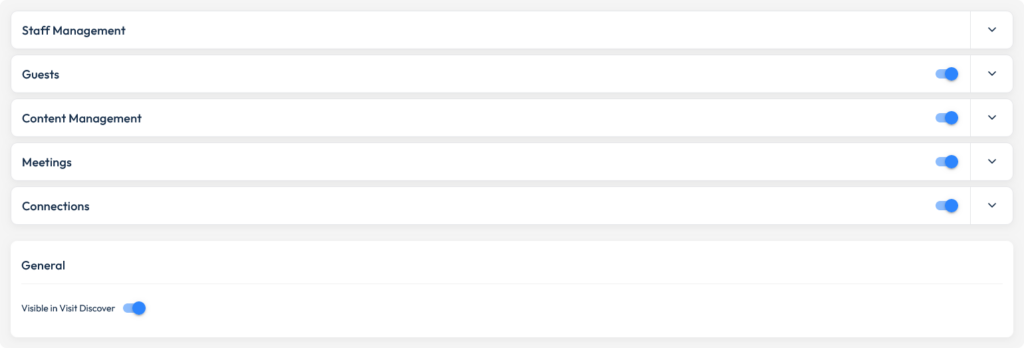
Every partner created has an empty profile created automatically, they may also add as many products as the wish. If this setting is not enabled, content may only be managed by the event organiser under Design > Digital Content.
Note a partner’s profile name will default to the name supplied when they were created. When editing the profile, it is possible to supply an alternative name. This is what will appear in Visit Discover’s exhibitor directory.
Enable General > Visible in Visit Discover for the partner registration types which are to be public facing, so visible in Discover’s exhibitor directory.
Enable Meetings > Allows exhibitors and attendees to engage in meetings and interact via chat and messaging for partner registration types you wish to engage with registrants. See above for information about defining online event timings.