In this section, you’ll find step-by-step instructions to help you navigate through the initial setup process for your event, focusing on essential configurations and settings.
We’ll cover how to create a new event, define important attributes including timezone and reference details, and utilise specific features such as attendance calculation. You’ll also learn about setting up time slots to manage visitor numbers effectively and creating rules for advanced deduplication.
Please follow along as we delve into the specifics of each feature to assist you in setting up your event successfully.
Access from Homepage: Select your event > Event > Setup
Quickstart
- Select + Add to create a new event.
- Complete the new event form.
- Select Save. Visit Create takes you to the event setup page. You can now Configure an event.
Configure an event
Access from Homepage: Select your event > Event > Setup
There are four default tabs:
- Setup: you can amend the event details that you provided during event creation.
- Opening times: define opening times for each event day. This allows participants to schedule meetings only during the set opening times.
- Custom fields: lists any custom fields inherited from the organisation. You set the values here. To create custom fields, refer to Add and edit custom fields.
- Visitor questions: you can add here questions that have been added to the event registration form. Answers to these questions will be made visible to exhibitors who scan the visitor. Refer to Configure Visit Connect Question List for more information on setting up visitor questions.
- Floorplan: if your event uses MapsIndoors or ExpoFP for floor plans, you can enter your API settings here to enable floor plan integration in Visit and display it into your visitor app (Discover).
If your contract includes the Advanced Deduplication module, there is also an Advanced deduplication tab (here you can set up rules that will enable the system to determine the primary record), and a Timeslots tab, in case you have the Capacity Management module enabled. See Modules for more information.
Setup
This table provides additional information about some of the fields on the new event form. Your settings on this form affect the attendance data in the Service Centre, intelligence and Visit Connect:
| Field | Details |
|---|---|
| Timezone | Set the timezone for the event. It is important to provide this information as it affects reporting. |
| Reference | Your internal reference. |
| Enable Jublia | Select this to enable the Jublia integration. Provide your Jublia event code. |
| Attendance calculation | You can choose what sources Visit Create uses to count attendees. The options are: Print: a visitor’s badge is printed from a Check-in. Scan: A visitor’s badge, voucher or e-badge is scanned by a Check-in. Connection: An exhibitor scans a visitor’s badge to capture a sales lead. |
| Limit start offset / Limit end offset | Allow Visit Create to record attendees before and after the event start and end dates. |
| Enable online networking (Beta) | Allows exhibitors and attendees to engage in meetings and interact via messages. Requires Networking module, and Staff and Meetings settings enabled in Visit Connect. |
| Portfolio | Add the event to one or multiple portfolios from your organisation. See Portfolio for more details. |
| Options | You can restrict event access based on age by defining a minimum age. Note that this implies that you must include the date of birth as a mandatory question in your registration form. |
| Allow visitors from other events | With this setting you can enable visitor access for registrants from co-located events without the need for another registration form or badge. |
| System options | These settings are only available to system users: Type: Select one of the available options: Trade show or Smarter booth. Office location: Select managing (Visit) office. Magento / VC Shop enabled (non-editable): This is where you can see if a Magento shop has been enabled, and access the share-able shop link. This is set up in Magento and allows exhibitors to purchase scan & Touchpoint licences. These settings are only available to system users: Type: Select one of the available options: Trade show or Smarter booth. Office location: Select managing (Visit) office. Magento / VC Shop enabled (non-editable): This is where you can see if a Magento shop has been enabled, and access the share-able shop link. This is set up in Magento and allows exhibitors to purchase scan & Touchpoint licences. Link Touchpoints with Create: When this is enabled, you can use Visit Create for Touchpoint management. More on this subject here. Force Native App for Scan Only users: This setting directs users who scan the Visit Connect licence QR code to the App Store/Google Play Store to download and use the native app. Also, the licence PDF generated for each exhibitor will only contain information about Visit Connect native app, excluding any mentions of the web app. |
Timeslots
You can set timeslots with a maximum visitor limit, add them to the registration form, and use them when setting up access control for the Check-in. Visitors choose a timeslot when registering. This allows you to limit the number of people in your venue. This feature is only available when you have the Capacity Management module enabled. See Modules for more information.
Access from Homepage: Select your event > Event > Setup > Timeslots
- Select + Add.
- Select the date of the timeslot.
- Set the start and end times of the timeslot.
- Assign a name to the timeslot. This name appears on the registration form.
- Set the maximum registrations.
- Select the forms in which the timeslot should be displayed. The timeslots are available on the timeslot page in all forms but are only set to Show on the ones selected here. You can change this at form level, by hovering over the timeslot, if desired.
- Select Save. You can now view and edit the timeslot on the Timeslots tab.
To add timeslots to a registration form, you must add the timeslots page. Refer to Add pages for more information.
You can configure Check-in access rules to ensure visitors cannot enter outside their timeslot. Refer to Using Check-in for more information.
If no timeslots are available, registrants see a message telling them the event is fully booked, and prompting them to contact the organiser.
Advanced deduplication
Access from Homepage: Select your event > Event > Setup > Advanced deduplication
Advanced deduplication allows you to find and manage duplicate registrant records. For more information, refer to Find and manage duplicate visitor records.
To use this feature, you need the advanced deduplication module in your organisation’s contract. Contact your client manager to discuss this. For more information on modules, refer to Modules.
You need to set up a hierarchy, which Visit Create uses to determine which record among duplicates has priority.
Set up at least one rule:
- Select + Add.
- Enter a name for the rule.
- Enter the rule types and conditions. There are two types of rules:
- The rule applies when at least one condition is met.
- The rule applies when all the conditions are met.
- Select Save to create the rule and return to the Advanced deduplication tab.
- When you run advanced deduplication, Visit Create works through the rules in order to decide which record has priority.
Custom fields
You must set values for any custom fields during event setup. For information on creating custom fields, refer to Add and edit custom fields.
- From the Setup page, select Custom fields.
- Select Edit
- Enter your value in the Value field and select Save.
Visitor questions
This tab displays the questions available for export in the Visitors section of the Service Centre.
By default, this list contains all questions configured on forms within the event. It’s also possible to add questions available in the question editor (other questions from the same event or organisation level).
You can also add the questions to your own custom templates, but they need to be in the visitor question list to be usable in the mappings. For example, you could include a contact ID for your own CRM platform.
Create the questions on the Questions page. Refer to Add and edit questions for more information.
Add the questions to the Visitor questions list in event setup:
- From the Setup page, select Visitor questions.
- Select + Add.
- Select the questions you want to add. Visit Create marks the questions as pending.
- Select Save. Refer to View and edit visitor data for information on viewing and editing answers to visitor questions.
Floorplan
This section enables you to integrate your MapsIndoors and ExpoFP floorplan into Visit, and allow your visitors to access it from their event app.
Follow a few simple steps to finalize your setup:
MapsIndoors:
- Mapping property: configure which data field is used for navigation: Booth Number, Contact Reference, or Partner ID.
- API Key: enter your MapsIndoors API key.
- Venue ID: enter the MapsIndoors venue ID.
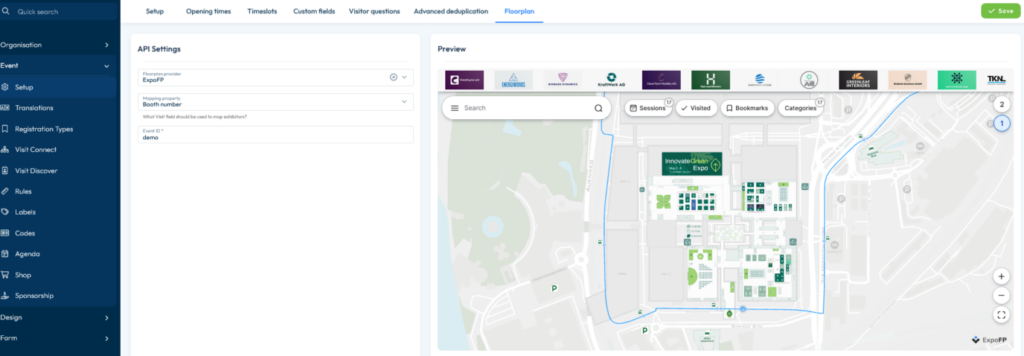
ExpoFP:
- Mapping property: configure which data field is used for navigation: Booth Number, Contact Reference, or Partner ID.
- Event ID: enter your ExpoFP event ID.
Once you’ve entered these details, you’ll see a preview of your floorplan on the right hand side of your screen.