Check-in is Visit’s proprietary software, designed with the purpose of streamlining on-site tasks for event organisers, ensuring a smooth and efficient event experience from start to finish. These include registration, access control, badge printing, payments, and more.
This document explains the settings in Visit Create. For information on setting up the Check-in software, refer to the Check-in set-up.
Access from Homepage: Select your event > Onsite > Settings
Use the Settings page to set up your Check-in before the event starts.
Configure general settings
Access from Homepage: Select your event > Onsite > Settings > Visit Check-in settings
- Select Change logo to upload a custom logo for your event. This will appear in all Check-ins.
- Select Application color and Action color to set a color scheme. This is used throughout the Check-in, for example for button colors.
- Enter an Unlock password and a Settings password. Whenever someone wants to unlock or modify the settings on a Check-in, they must enter one of these passwords.
- Activate the Enable automatic screen lock option to secure your Check-in terminals following a period of inactivity. The maximum limit for screen lock is 10 minutes.
- Select Allow entrance to ‘invited’ visitors to allow visitors who have received an invitation email but have not registered to enter.
- Enable onsite staff to unlock a Check-in by scanning the badge of an onsite staff.
- Choose your keyboard layout in Check-in keyboard input.
- Set up Printing by selecting a default document, such as a badge, and add rules if you wish to print different types of documents based on your visitors’ registration type.
Enable Check-in features
Select the feature(s) you want to enable:
| Feature | Settings |
|---|---|
| Manned registration | In manned registration mode, your host staff can use Check-in to manually register visitors at the event. This also enables Service centre mode. You will be requested to select a default registration type and translation, and select a registration form corresponding to each registration type (Map Registration Type). |
| Self registration | In self registration mode, visitors can use Check-in to register themselves on the event day. |
| Access control | You can use access control mode to measure attendance and restrict access to certain areas of the event. You must attach a scanner to the Check in to use this mode. To restrict access to areas: Select + Add to add a new rule. Enter the rule details. The Location filter lists all event locations, as defined in the Locations tab. Refer to Manage locations for more information. |
| Scan & Go | Visitors can scan a document such as a voucher and print their visitor badge. |
| Visit Connect | In Visit Connect mode, you can assign Touchpoints to exhibitors’ digital content and download exhibitor’s connection data collected using Touchpoints. |
| Cash Register | Allows you to take payment at an event when a visitor has registered. |
- For Manned registration, Self registration and Access control, you need to configure the feature. Select the dropdown arrow, and refer to the following for information on the settings:
Manned registration
- Select the Default registration type for visitor registration from the drop-down list. The host using the Check-in can manually choose a different registration type for each registrant, if necessary.
- Select the Registrant default translation. If you do not select one, Visit Create uses the default translation for the event.
- Select Auto print to enable the Check-in to print a badge after every registration.
- In the Map registration type section, select Add to create mappings between registration types and registration forms.
- Select Save to apply your changes.
Self registration
Select a registration form from the Form used for visitor registration dropdown.
Access control
You can use access control rules to limit access to certain areas or times. For example, you could allow a visitor to access the area only once a day. Or you can enable a time window for seminar access control. Visit Create applies the rules in the order of the list. If a visitor does not match any of the rules, Visit Create uses the default.
- Select Add to create a new rule.
- Complete the rule details. You can add multiple conditions.
- Select Save to add the rule to the list.
- Ensure the rules are in the correct order. To reorder the rules, select Toggle sorting , then drag and drop the rules.
- To edit, disable or delete a rule, hover over it and select Open menu .
- Choose the default access setting. In the Set as default options, select either Allow or Deny.
Add timeslot rule
Add the following rule to make all Check-ins check the Timeslot a visitor is registered for:
- Category : Timeslot
- Field : Current Time
- Operation: Equals
- Value: Timeslot window
The Timeslot is strictly adhered to. If a visitor turns up too early or too late they will not be able to be scanned in.
You can choose to add an information message to display if someone is refused entry e.g.:
“You are not currently allowed to enter. You’re booked for #timeslot_summary#.”
Manage locations
Access from Homepage: Select your event > Onsite > Settings > Locations
You can divide your event into multiple locations. You can then assign these locations to Check-ins and use them to:
- Restrict access to certain areas.
- Monitor dwelling time. Refer to View and edit visitor data for information on how to access this data.
- Track current attendees on the Basic Intelligence Dashboard.
Add a location
- Select Add.
- Enter a name for the location.
- Select the location type. Gate is a place where people enter or exit the event. This type is most often used for Check-ins using access control mode. Area is a room, hall, or other space at the event. This type is most often linked to seminars.
- Optional: if the location type is Gate, you can set the gate direction (IN, OUT, or Camera).
- Select Save to add the location and return to the Locations list.
Edit a location
- Hover over the location you want to edit.
- Select Edit .
- Change the location settings. Refer to Add a location for more information about the settings.
- Select Save.
Get the latest Check-in image
A Check-in image is a bootable version of the Check-in. This means you can boot your laptop(s) from a Check-in USB stick, allowing you to use the Check-in on a laptop without overwriting your operating system or files.
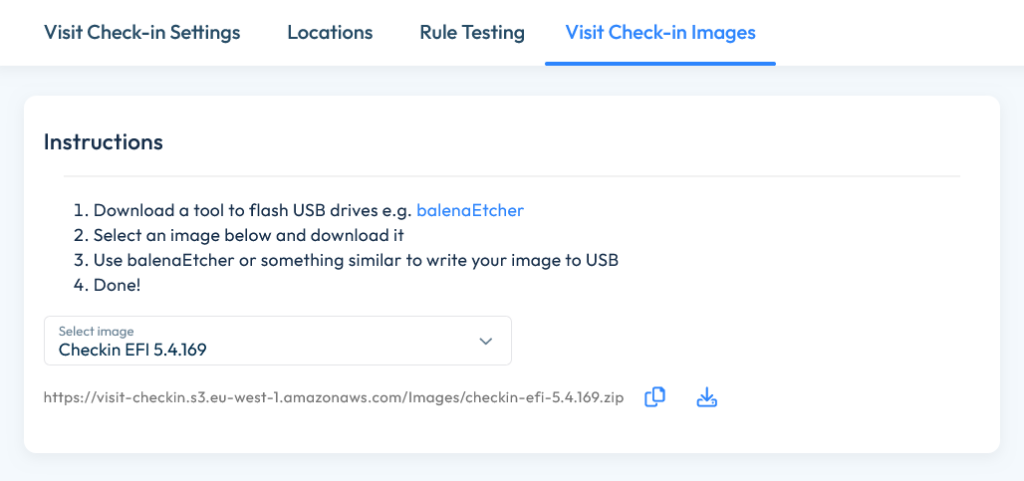
Access from your Create Homepage: Select your event > Onsite > Settings > Visit Check-in Images and follow the steps.
1.Select an image from the drop-down menu and download it (latest version is recommended).
2.Right-click on the downloaded file and select Extract All to unzip the file (only when the downloaded file is a zip file – archive/compressed file).
3.Use balenaEtcher or a similar tool to write your image to an USB stick. See steps below:
Step 1: Download the tool from the above-mentioned link. Choose the version compatible with your laptop’s operating system. We recommend choosing the portable version for Windows, in case you don’t have admin rights to install the software on your laptop.
Step 2: Open balenaEtcher, then click on Flash from file and choose the unzipped Check-in file from your laptop.
Step 3: If the USB stick is already connected, it should be automatically selected, otherwise please insert it into an USB port and click on Select target to choose your device.
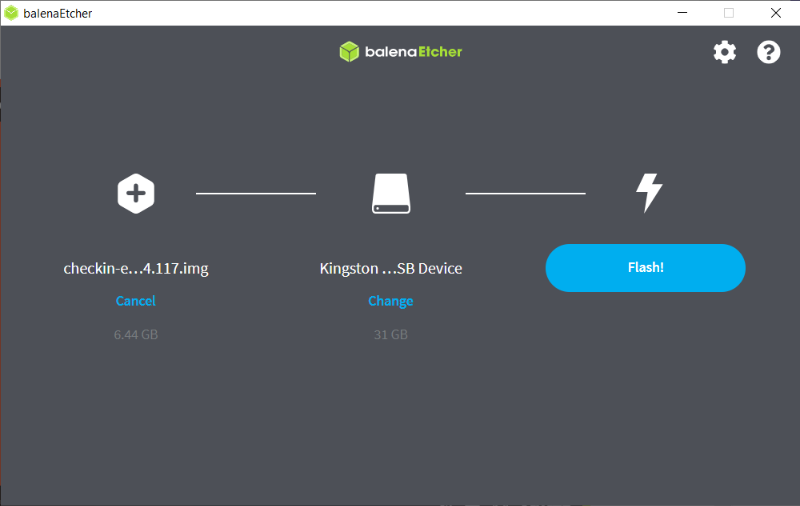
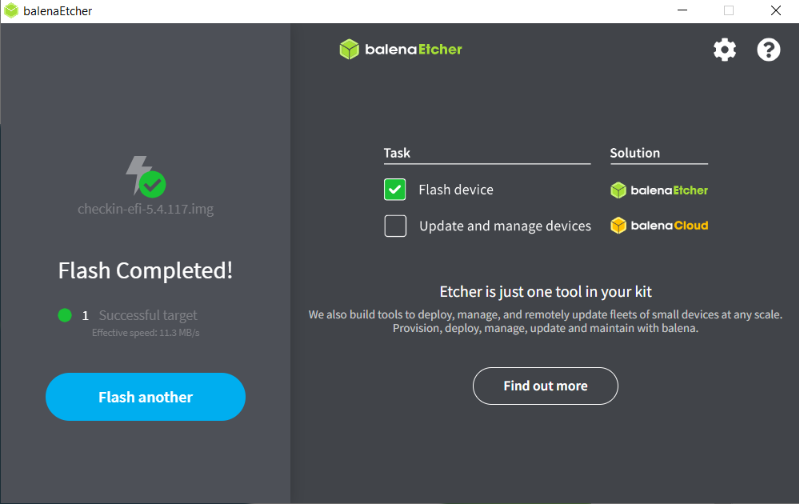
Step 4: Click on Flash to write your Check-in image to the USB stick. Wait until you see the message Flash Completed!, then you can remove the USB stick.