You can use Visit Create to create different types of documents for your event, such as letters, badges, or vouchers. You can use these documents in forms or emails. You can also print the documents as needed.
In this section, you will learn how to add and edit documents in Visit Create.
Access from Homepage: Select your event > Design > Documents
You can create and configure documents, such as letters, badges or vouchers, for use across Visit Create. This page describes how to add and edit documents.
Visit Create manages email templates separately. Refer to Create email templates for more information.
Add a document
- Select + Add.
- Enter a name for the document. This is the name Visit Create uses to display the document.
- Select a document template.
- Select Save. Visit Create takes you to the document configuration screen.
- Optional: make the document your default document. You must have one default document, which acts as a fallback if you do not attach a document to your form. Refer to Configure form settings for more information.
- Optional: make the document available at Organisation level so you can access it from all events and then modify it as needed per event. You can do this by changing the Document Level to Organisation.
Configure a document
To access the configuration screen from the Documents list:
- Hover over the document you want to configure.
- Click on the right-side menu icon and select Edit.
Document properties
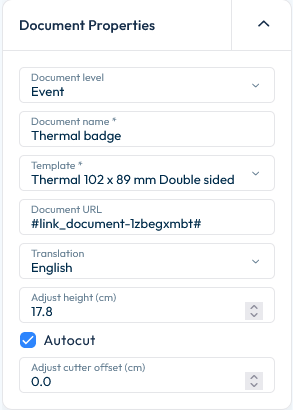
In the properties section you can view and adjust various document details:
- Document level – define if this document will be used at event or organisation level.
- Document name – view and/or change the document name initially entered.
- Template – view or change the selected document template.
- Document URL – displays the dynamic field used to insert the link to individual documents. Use this in the email editor if you wish to share the document URL with event participants.
- Translation – view and change translation. You can choose different document designs for each available translation.
- Adjust height – allows you to change the height of your document. Note that, depending on the type of supplies and printer you use, this might not always be advisable.
- Autocut – you can enable the auto-cut function for Zebra printer templates, and also adjust cutter offset to fit your type of badge-paper. This option is only available for newly created documents, starting with Visit Create 5.5.

Add and edit elements
Add a new element:
- Select the element type, for example, Text .
- Draw the element where you want it to go on the page. For text elements, type the text you want. For image elements, Visit Create opens an image selection window, allowing you to use an image you previously uploaded, or to upload a new one.
- Configure the element in the Properties menu.
- Optional: use dynamic fields and custom fields.
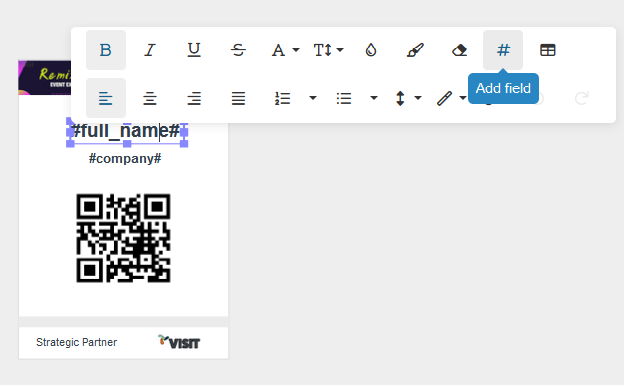
- Select or add a new Text element.
- In the text box menu, select Add field .
- Select a field from the list.
- Select Add. Visit Create adds the field code in the text element.

Edit an existing element:
- Select the element on the Elements list, or use the Select tool to choose an element on the page. When you select an element, Visit Create displays the Properties menu for the element.
- Edit the element settings in the Properties menu.
Using Translations
When creating different versions of a document for each available translation, you must select the ‘use translations’ checkbox in the Properties section for each text element you add to the design, after selecting the translation in the Document Properties section. This enables the translation(s) for each individual element. Note that the Properties section will appear on the left-side menu when you select a text element.


Preview a document
The Preview button allows you to instantly visualise how a document looks with your current design.
Select the Preview button in the top-right corner, then select a visitor from the list in the bottom-left of the screen to view the document with their details. All editing features are disabled in Preview mode.
Add and edit rules
Rules allow you to show or hide elements in a document, based on certain conditions. This means you can produce different versions of a document, from a single document design. For example, you could use rules to display a coloured dot that indicates which registrant type a registrant is. Place multiple, overlapping, coloured shapes in the document, and add rules that hide or show them depending on registration type.
- Select + Add rule to add a new rule, Edit rule to modify an existing rule or Delete if you want to eliminate a rule.
- Provide the following rule settings:
| Setting | Properties |
|---|---|
| Name | Enter a name for the rule. |
| Apply this rule when at least ONE condition below applies/ Only apply this rule when ALL conditions below apply | Choose one. |
| Conditions | Set up the rule conditions. Select a Category and Field. These relate to fields on the registration form. Then choose an Operation and Value. |
| Operations | Choose what to do when the conditions are met. You can show or hide an element, or modify text. |
3. Select Save.