There are two ways of using Check-in, depending on the onsite situation and desired scenario:
1.You can install Check-in on a laptop. This is the recommended scenario when:
- You have a reliable internet connection, as the Check-in laptop needs to be online to download data.
- The USB stick can be removed while using Check-in.
- You don’t have a problem with the laptop’s operating system and all files being permanently deleted.
- You only have one USB stick available for multiple laptops.
2.You can boot the Check-in software from a USB stick. Use this when:
- You have one USB stick per each Check-in terminal.
- The USB stick remains connected to the laptop while using Check-in.
- There is no internet connection onsite. This means you must prepare the USB sticks in advance.
- You wish to keep the laptops’ operating system and files (personal or rental equipment).
1. Installing Check-in on a laptop
These instructions are for Windows 8 and Windows 10 users. Contact your client manager if you need help on Linux or macOS.
Prerequisites
- Your laptop must be able to boot from a USB stick and write to the local HDD (hard disk drive).
- You need an USB stick with a minimum size of 16GB for the Check-in loader image. Make sure that your USB stick is using FAT32, and format it to FAT32 in case it isn’t.
- Your laptop must have at least one available USB port and you must have admin permissions to connect external devices.
- Stable internet connection. In the event of an unstable or missing internet connection, you can also install Check-in using a second USB stick containing a Check-in image.
Scenario 1 – Internet connection available
Prepare the USB stick
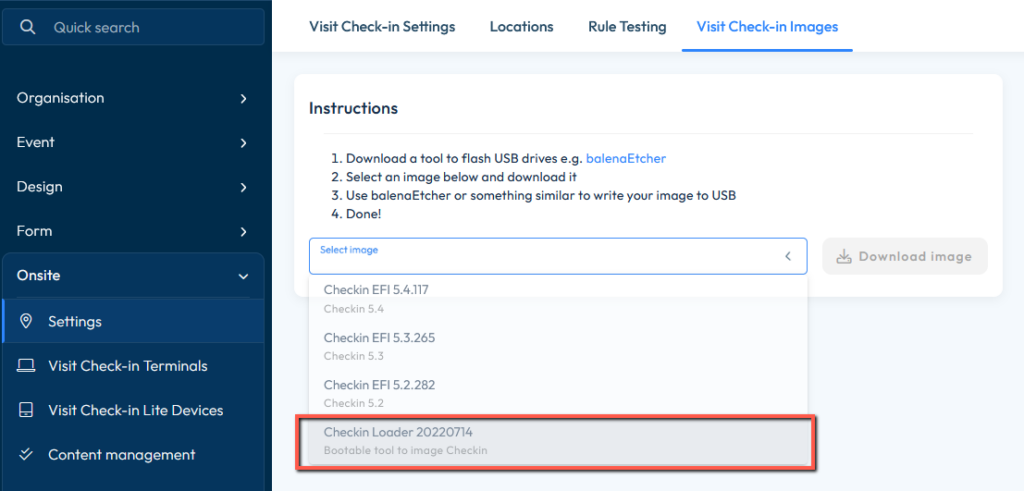
Add the Check-in Loader image to your USB stick. Refer to Get the latest Check-in image for more information on how to do that, and make sure you select the correct image file for this purpose (Check-in Loader):
How it works:
You need the USB stick that you previously prepared:
- Make sure your laptop is switched off.
- Insert the USB stick with the Check-in Loader image on it.
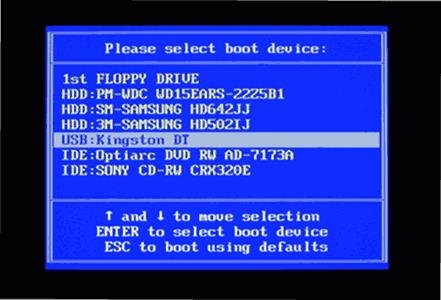
- Start your laptop and enter the boot menu. Accessing the boot menu varies depending on your machine, but usually you need to press F12/F8/F2 or Del key as the computer starts.
- Select the USB loader stick as the boot device. This runs the loader software.
- Select the option Check-in image copy. Do not remove the loader USB.
- You will be asked which image you wish to install. Select Latest released production image (EFI).
- Select OK. You will see a screen asking which disk to install the image on.
- Select your local HDD.
- When the process finishes, it will ask you if you want to reboot. Select Yes. The laptop reboots and starts the Check-in software. You can now remove the USB and repeat the process for a different laptop.
- Enter a Check-in Licence code and start using the software.
Scenario 2 – No internet connection
Prepare 2 USB sticks
Add the Check-in Loader image to one of the USB sticks. Refer to Get the latest Check-in image for more information on how to do that, and make sure you select the correct file for this purpose (Check-in Loader):
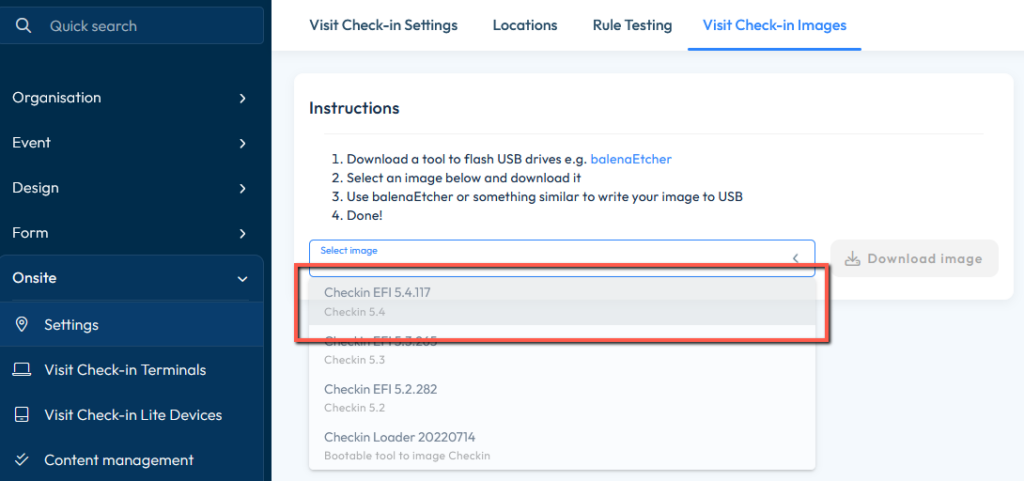
You will need to add a Check-in image to the second USB stick. Refer to Get the latest Check-in image for more information on how to add the Check-in image file on a USB, and make sure you select one of the image files (NOT the Loader!). Also, please ensure that you unzip the file before flashing it to the USB:
How it works:
You need the two USB sticks that you previously prepared:
- Make sure your laptop is switched off.
- Insert the USB stick with the Check-in Loader image on it.
- Start your laptop and enter the boot menu. Accessing the boot menu varies depending on your machine, but usually you need to press F12/F8/F2 or Del key as the computer starts.
- Select the USB loader stick as the boot device. This runs the loader software.
- Insert the second USB, containing the Check-in image.
- Select the option Check-in image copy from USB. Do not remove the loader USB.
- You will see a screen asking which USB to copy the image from. If unsure, select the one with less GB available. That is the Check-in image USB.
- Select OK. You will see a screen asking which disk to install the image on.
- Select your local HDD.
- When the process finishes, it will ask you if you want to reboot. Select Yes. The laptop reboots and starts the Check-in software. You can now remove the USBs and repeat the process for a different laptop.
- Enter a Check-in Licence code and start using the software.
2. Booting from a USB stick
You can use a bootable USB stick with the Check-in software. This will allow you to use the Check-in on a laptop without overwriting your operating system or files.
Prerequisites
- Your laptop must be able to boot from a USB stick.
- You need an USB stick with a minimum size of 16GB for the Check-in imager. Make sure that your USB stick is using FAT32, and format it to FAT32 in case it isn’t.
- Your laptop must have at least one available USB port and you must have admin permissions to connect external devices.
These instructions are for Windows 8 and Windows 10 users. Contact your client manager if you need help on Linux or macOS.
Prepare the USB stick
Refer to Get the latest Check-in image for more information on how to add the Check-in image file on a USB, and make sure you select the correct file (NOT the Loader!):
How it works:
Once you have the USB stick loaded with the Check-In image, you must add the licence. Adding the licence means loading the actual event data.
To do this you must follow the steps below:
1.Restart the computer on which you wish to use Check-in, and boot it from the image USB stick.
2.Usually you have to press F12/F8/F2 or Del key to access the computer Boot Menu and select USB/Boot from USB storage device.
3.Once you select USB, the computer will load the software from the USB stick. Make sure the USB stays connected while using Check-in.
4.Check-in software will ask for a licence, a pop-up window will open where you can insert the licence code.
5.After adding the licence, the Check-in is loaded with the event data.
6.Start using the software.